
Paint a countertop.
*SCROLL TO BOTTOM OF THE POST FOR AN UPDATE!*
Probably the scariest part of this project was painting our countertops. While watching an episode of Debbie Travis Painted house one evening, I saw her paint a Formica counter. Huh, maybe I could do this. I mentioned it to some friends and they looked at me like I was nuts. Not the first time they have done that either. Because of the initial reaction, I filed the idea away.
As the kitchen/floors project wore on, our small counter space wasn't cutting it. I am pretty sure it was installed in the early 1950's. It was a gray-green with pearl white swirls on it. Very retro. So not for our house. It stuck out like a sore thumb. I pulled the painting idea back out of my memory and decided to do it. The Debbie Travis version said to use melamine paint. Great. I had no idea what it was and it sounded expensive. I googled latex paint countertops and got a few hits. From what I read, I thought I could get by with the supplies on hand. Lord knows, I don't like to spend any more money than I have to. I decided to try and get a granite effect like the Debbie Travis episode had.
First, I cleaned the surface with 409 cleaner and let it dry. Then I painted the entire countertops with a latex primer (white). After it dried (which primer does not take that long to dry) I applied a neutral basecoat. I believe the color was nutty tan. Oh, I can't remember, but it was tanish. I then sponged black over the tan. The directions called to use a seafoam sponge, but because I live out in the sticks the closest thing I could find was a car wash sponge. It had big holes in it, and hey, it was a buck. (Told ya I am cheap.) When sponging the black on, only allow very little of the basecoat (tan) to show through. My suggestion is to start in a small area. Sponge the black on a little at a time, until you get the desired effect you want.
By the time I had finished sponging the entire area, it was completely dry at where I had started. I then used a brown-coppery latex paint to randomly sponge the black. How much is entirely up to the person. Start small, then add more if you feel you need to. Don't worry if you get too much on, because you can always go over it with the black sponge if you need to. Also, make sure to dab most of the paint off of the sponge so there is no glops of paint on the counter. That doesn't look good. Trust me on that one.
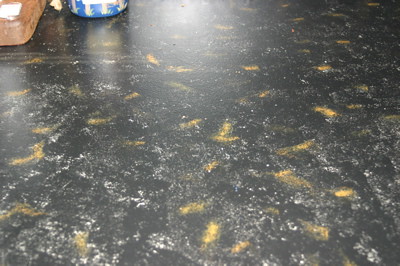
This is how it looks after all the sponging.
The final process is to seal the countertops with a water based polyurethene. No less than three coats!!! Allow a two hour drying time in between coats and 24 hour drying time after the final coat of polyurethene. Then you are done! Honestly, when I started this project I didn't think it was going to turn out good. Now, it looks so good I should have done it sooner. It has only been a few weeks since I have done this, but it has held up well. Just remember, no hot pans and use a cutting board. Because of the paint I had on hand, this project only cost me $5. I would say for a normal kitchen area the cost of paint and sponges might run a person between $40 and $50.
I would like to also point out that everything I have read says that this should be only for a quick fix. Though I did read where one person did this six years ago and they countertops are still in good condition. I suppose time will only tell. But for now, I am happy!
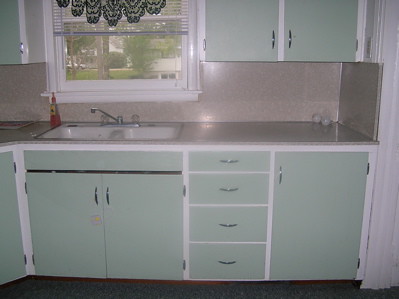
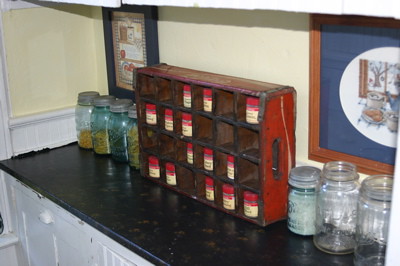
Kitchen before we started this mess.
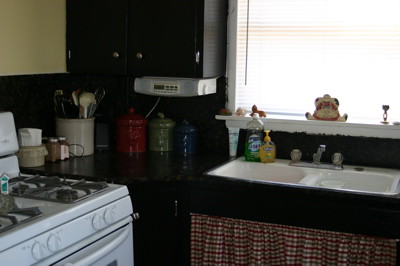
The countertops look completely black against the cabinets, but in true life they do stand out.
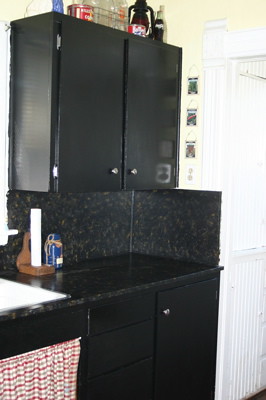
My pantry countertop.
*UPDATE*
It is August of 2007 and I must report some sad news. The paint on the countertop has started to chip away in the work areas. It is mostly limited to around the sink area. Now, I am thinking that a couple more coats of polyurethene should have been done. At least five.
While I do still think this is an easy (and cheap) solution for old countertops, I do think some re-thinking must be done around the sink area.
Probably the scariest part of this project was painting our countertops. While watching an episode of Debbie Travis Painted house one evening, I saw her paint a Formica counter. Huh, maybe I could do this. I mentioned it to some friends and they looked at me like I was nuts. Not the first time they have done that either. Because of the initial reaction, I filed the idea away.
As the kitchen/floors project wore on, our small counter space wasn't cutting it. I am pretty sure it was installed in the early 1950's. It was a gray-green with pearl white swirls on it. Very retro. So not for our house. It stuck out like a sore thumb. I pulled the painting idea back out of my memory and decided to do it. The Debbie Travis version said to use melamine paint. Great. I had no idea what it was and it sounded expensive. I googled latex paint countertops and got a few hits. From what I read, I thought I could get by with the supplies on hand. Lord knows, I don't like to spend any more money than I have to. I decided to try and get a granite effect like the Debbie Travis episode had.
First, I cleaned the surface with 409 cleaner and let it dry. Then I painted the entire countertops with a latex primer (white). After it dried (which primer does not take that long to dry) I applied a neutral basecoat. I believe the color was nutty tan. Oh, I can't remember, but it was tanish. I then sponged black over the tan. The directions called to use a seafoam sponge, but because I live out in the sticks the closest thing I could find was a car wash sponge. It had big holes in it, and hey, it was a buck. (Told ya I am cheap.) When sponging the black on, only allow very little of the basecoat (tan) to show through. My suggestion is to start in a small area. Sponge the black on a little at a time, until you get the desired effect you want.
By the time I had finished sponging the entire area, it was completely dry at where I had started. I then used a brown-coppery latex paint to randomly sponge the black. How much is entirely up to the person. Start small, then add more if you feel you need to. Don't worry if you get too much on, because you can always go over it with the black sponge if you need to. Also, make sure to dab most of the paint off of the sponge so there is no glops of paint on the counter. That doesn't look good. Trust me on that one.
This is how it looks after all the sponging.
The final process is to seal the countertops with a water based polyurethene. No less than three coats!!! Allow a two hour drying time in between coats and 24 hour drying time after the final coat of polyurethene. Then you are done! Honestly, when I started this project I didn't think it was going to turn out good. Now, it looks so good I should have done it sooner. It has only been a few weeks since I have done this, but it has held up well. Just remember, no hot pans and use a cutting board. Because of the paint I had on hand, this project only cost me $5. I would say for a normal kitchen area the cost of paint and sponges might run a person between $40 and $50.
I would like to also point out that everything I have read says that this should be only for a quick fix. Though I did read where one person did this six years ago and they countertops are still in good condition. I suppose time will only tell. But for now, I am happy!
Kitchen before we started this mess.
The countertops look completely black against the cabinets, but in true life they do stand out.
My pantry countertop.
*UPDATE*
It is August of 2007 and I must report some sad news. The paint on the countertop has started to chip away in the work areas. It is mostly limited to around the sink area. Now, I am thinking that a couple more coats of polyurethene should have been done. At least five.
While I do still think this is an easy (and cheap) solution for old countertops, I do think some re-thinking must be done around the sink area.
posted by Unknown at 6:45 PM
![]()
17 Comments:
What a fantastic job on the countertops. I'm like you . . . the cheaper I can get the project done, the better. As long as the project turns out good.
I never would've thought about painting formica or thought it would look half-decent, but your pictures changed my mind. I'll keep you in my memory-bank in case I decide to do mine someday.
Wow! That really looks impressive! You are an artist!
I love the look of the kitchen! Your house must feel like new right now.
Looks awesome! In fact I'm going to goggle cause I HATE my couter tops! YOU INSPIRE ME!
Wanna earn some extra money & a trip to florida in the winter? No okay fine then - I'll try it myself!
This comment has been removed by a blog administrator.
This comment has been removed by a blog administrator.
I love it, I love old houses too. I can't wait to see all your progress. I linked to your blog from Judy Laquidara's and I'm glad I did. I am going to read it all now!!
WHile reading your description I was thinking 'hmmm sounds dodgy' but it looks fantastic in the photo. Well done!
Boy, you sure are brave, but the results are truly remarkable! Funny, I remember seeing that episode with Debbie! Ha!
I looked back a few posts about the floors - Wow! I'm always amazed when people paint or carpet wood floors! they are stunning!Good job!
BTW, Thanks for stopping at my post!
Chrissie
I'm really impressed with the kitchen, and all the things you've done on this house. Wow!
This looks fabulous, and I'm kind of curious how the counter top is holding up a few months later.
Wow! I love the countertops. I am going to have to do some googling as well. I live in an old house and I feel overwhelmed by all the things we need to do. I really want to do something with the kitchen before the kids go back to school. Like you I need a get me through the next 5 years kind of project. Thank you for sharing
What a great job! I once tried the painting of a Linolium floor using a similar process (it was in a tiny bathroom) and it worked out well too...who'd have thought it!
We have painted counter tops. They are actually wood. I love them, except they have started peeling. If you know how to get it to stop, let me know, it's driving me CRAZY!
By the way, you kitchen is very cute!
Hi there! Just wanted to let you know that it's PARTY TIME over at my blog! Swing by and check it out!!!
Love the painted counter tops & the black cabinets too! I have icky formica in my kitchen too.
Have you come up with a solution for the areas around the sink?
I'm curious to what color/ brand of paint you used on the black cabinets?
Post a Comment
<< Home